In this article we will discuss about data transfer objects (DTOs), Populators, and converters.
Data Transfer Objects (DTOs)
A DTO is an object that is used to encapsulate data and transfer data between modules of application, it is helpful when we need to group data and pass around that data. It also decouples the presentation/façade layer from the service layer which contains only data values and has no business logic but getters and setters in the corresponding POJO class.
Populators
These are used to fill or populate the variables of the data transfer object from the model. Let’s say we have a customer table (CustomerModel) having 40 attributes and we want to display only 15 attributes in the front end or send those details to any other application. Then we can create a DTO having only those 15 attributes and fill those attributes from the Model. We can also put some business logic inside the populator if needed.
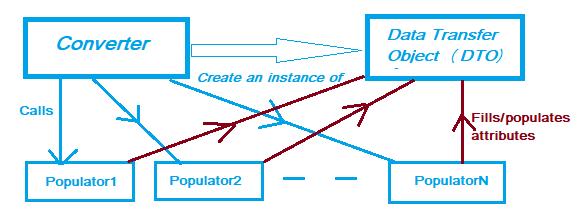
Converters:
A converter creates a new instance of DTO and thereafter call the Populators mentioned in the to fill that DTO. It contains a list of Populators which are called one by one to fill DTO from the Model object.
Implementation
We are going to implement 2 scenarios here:
- Create a completely new item type (table in DB), DTO, populator, and converter for this new type and use them in the façade layer to fill the DTO from the Model object.
- Add a new attribute to the existing item type and create a populator for the same and add this populator to the existing item type converter’s list of populators, to fill in this attribute in DTO also.
Scenario1
Step 1:
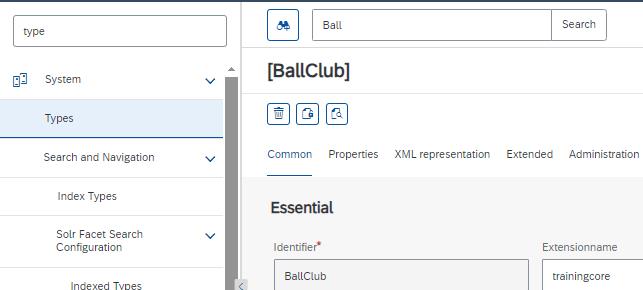
Create a new item type having code, name, city, game, capacity, gameEnum and pricePerHr attributes by defining the same in <customextension>core-items.xml:
<itemtype code="BallClub"
          autocreate="true"
          generate="true">
    <deployment table="Club" typecode="20001"/>
    <attributes>
        <attribute qualifier="code" type="java.lang.String">
            <description>This is used to code of an Arena</description>
            <modifiers optional="false" unique="true" initial="true" />
            <persistence type="property">
                <columntype database="hsqldb">
                    <value>VARCHAR(10)</value>
                </columntype>
            </persistence>
        </attribute>
        <attribute qualifier="name" type="localized:java.lang.String">
            <description>This is used to store name of an Arena</description>
            <modifiers/>
            <persistence type="property"/>
        </attribute>
        <attribute qualifier="city" type="java.lang.String">
            <description>This is used to store city of an Arena</description>
            <modifiers/>
            <persistence type="property"/>
        </attribute>
        <attribute qualifier="game" type="java.lang.String">
            <description>This is used to store game of an Arena</description>
            <modifiers/>
            <persistence type="property"/>
        </attribute>
        <attribute qualifier="capacity" type="java.lang.Integer">
            <description>This is used to store capacity of an Arena</description>
            <modifiers/>
            <persistence type="property"/>
        </attribute>
        <attribute qualifier="gameEnum" type="GameEnum">
            <description>This is used to store the game enum</description>
            <persistence type="property"/>
        </attribute>
        <attribute qualifier="pricePerHr" type="java.lang.String">
            <persistence type="property"/>
        </attribute>
    </attributes>
    <indexes>
        <index name="ballClubCodeNameIdx">
            <key attribute="code"/>
            <include attribute="name"/>
            <include attribute="city"/>
        </index>
    </indexes>
</itemtype>
Step 2:
Do the build using “ant all” or “ant clean all”, start the hybris server, and perform an HAC update, it will create a corresponding Model class and table in the database with the name specified in the deployment tag.
Step 3:
Create a DTO having code, name, city, capacity, game and gameEnum attributes in <custom-extension>facades-beans.xml:
<bean class="org.training.facades.ballclub.data.BallClubData">
    <property name="code" type="String"/>
    <property name="name" type="String"/>
    <property name="city" type="String"/>
    <property name="game" type="String"/>
    <property name="capacity" type="Integer"/>
    <property name="gameEnum" type="String"/>
</bean>
Step 4:
Do the build using “ant all” or “ant clean all”, it will create a BallClubData POJO having those attributes as member variables, getters, and setters methods for the same generated.
Step 5:
As this is a new item type we need to write a new Populator by implementing the Populator interface and its populate method, to populate six attributes of DTO from the corresponding Model object.
package org.training.facades.populators;

import de.hybris.platform.converters.Populator;
import de.hybris.platform.servicelayer.dto.converter.ConversionException;
import de.hybris.platform.servicelayer.dto.converter.Converter;
import org.apache.commons.text.CaseUtils;
import org.training.core.model.BallClubModel;
import org.training.core.model.JSSCityModel;
import org.training.facades.ballclub.data.BallClubData;
import org.training.facades.jsscity.data.JSSCityData;

public class BallClubPopulator implements Populator<BallClubModel, BallClubData> {

    @Override
    public void populate(BallClubModel ballClubModel, BallClubData ballClubData) throws ConversionException {
        ballClubData.setCode(ballClubModel.getCode());
        ballClubData.setName(CaseUtils.toCamelCase(ballClubModel.getName(), true, ' '));
        ballClubData.setCity(CaseUtils.toCamelCase(ballClubModel.getCity(), true, ' '));
        ballClubData.setGame(ballClubModel.getGame());
        ballClubData.setCapacity(ballClubModel.getCapacity());
        if (ballClubModel.getGameEnum()!=null) {
            ballClubData.setGameEnum(ballClubModel.getGameEnum().getCode());
        }
    }

}
Here in this populator we are converting name and city of a Ball Club to Camel Case and then populating the DTO, and also checking of gameEnum is not null and then only populating the same in DTO, else it will throw a Null Pointer exception when we try to use “ballClubModel.getGameEnum().getCode()”
Step 6:
Create a bean for the populator written in step 5 and create a converter now by using the below code in <custom-extension>facades-spring.xml:
<bean id="ballClubConverter" parent="abstractPopulatingConverter">
    <property name="targetClass" value="org.training.facades.ballclub.data.BallClubData"/>
    <property name="populators">
       <list>
          <ref bean="ballClubPopulator"/>
       </list>
    </property>
</bean>

<bean id="ballClubPopulator" class="org.training.facades.populators.BallClubPopulator">
    <property name="jssCityConverter" ref="jssCityConverter"/>
Here property “target class” defines the DTO for which the converter will create an instance of and will use the populator defined in the list under the “populators” property, in our case it will create an instance of BallClubData and call the ballClubPopulator to fill the DTO.
Step 7:
Now in façade layer, we will get the Model from service layer and convert it to DTO using the above converter defined in step 6.
There are two methods we can use to convert Model to DTO using a converter:
1.  Converters.convertAll(getBallClubService().getBallClubs(), getBallClubConverter());
2.  getBallClubConverter().convertAll(getBallClubService().getBallClubs());
I am using one of the above and below is the implementation of the same in façade layer:
package org.training.facades.ballclub.impl;

import de.hybris.platform.converters.Converters;
import de.hybris.platform.converters.Populator;
import de.hybris.platform.servicelayer.dto.converter.Converter;
import de.hybris.platform.servicelayer.model.ModelService;
import org.training.core.model.BallClubModel;
import org.training.core.service.BallClubService;
import org.training.facades.ballclub.BallClubFacade;
import org.training.facades.ballclub.data.BallClubData;

import javax.annotation.Resource;
import java.util.List;

public class BallClubFacadeImpl implements BallClubFacade {
    private BallClubService ballClubService;
    private Converter<BallClubModel, BallClubData> ballClubConverter;


    public Converter<BallClubModel, BallClubData> getBallClubConverter() {
        return ballClubConverter;
    }

    public void setBallClubConverter(Converter<BallClubModel, BallClubData> ballClubConverter) {
        this.ballClubConverter = ballClubConverter;
    }

    public BallClubService getBallClubService() {
        return ballClubService;
    }

    public void setBallClubService(BallClubService ballClubService) {
        this.ballClubService = ballClubService;
    }

    @Override
    public List<BallClubData> getBallClubs() {
        //return getBallClubConverter().convertAll(getBallClubService().getBallClubs());
        return Converters.convertAll(getBallClubService().getBallClubs(), getBallClubConverter());
    }

}
Step 8:
Now in controller, we can use method create in step 7 to fetch the converted and send it to front end or any other app by exposing our API using REST-ful web services, sample code of the same is as below:
final BallClubsList ballClubsList= new BallClubsList();
ballClubsList.setBallClubs(ballClubFacade.getBallClubs());
return getDataMapper().map(ballClubsList, BallClubListWsDTO.class, fields);
Step 9:
Test the results by using the swagger application:
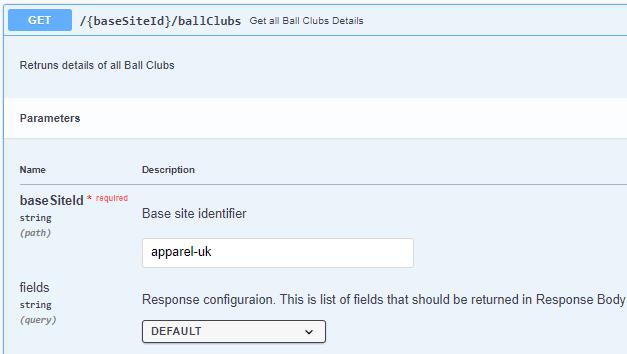
It will give the following results:
{
  "ballClubs": [
    {
      "capacity": 450,
      "city": "Atela",
      "code": "ATL01",
      "game": "Snooker",
      "gameEnum": "SNOOKER",
      "name": "Atela Club"
    },
    {
      "capacity": 600,
      "city": "Gurugram",
      "code": "BC14",
      "game": "Pool",
      "gameEnum": "POOL",
      "name": "JBL Gurugram Club"
    }
  ]
}
So here we can see that six attributes have been passed in response which are defined in DTO and WsDTO.
WsDTO Concept:
This is the data layer used by a version of the REST API in Omni Commerce Connect of SAP Commerce Cloud. It was introduced by SAP to add stability to REST API so that any changes to Model or DTO object does not directly affect the REST API, and remove dependency from the same. It also allows the control of how many fields we want to return or send in the response body.
We can explicitly request specific fields to be returned in response to our request, like BASIC, DEFAULT, and FULL.
Scenario 2:
Step 1:
There are two ways in which we can add an attribute to an existing item type:
- Add the attribute in the existing item type itself by defining the same in <custom-extension>core-items.xml with auto create and generate set to false as follows:
<itemtype code="Product" autocreate="false" generate="false">
    <attributes>
        <attribute qualifier="custom" type="java.lang.String">
            <persistence type="property"/>
        </attribute>
    </attributes>
</itemtype>
- Create a new item type with autocreate and generate set to true which extends the existing item type and add new attribute in the same in <custom-extension>core-items.xml as following:
<itemtype code="CustomProduct" extends="Product" autocreate="true" generate="true">
    <attributes>
        <attribute qualifier="custom" type="java.lang.String">
            <persistence type="property"/>
        </attribute>
    </attributes>
</itemtype>
For the second option, we can use the deployment tag to specify a new table in DB for this, however, it is not recommended as it will involve joins while fetching the product details from its parent types.
In this article, we are going to implement the approach 1.
Step 2:
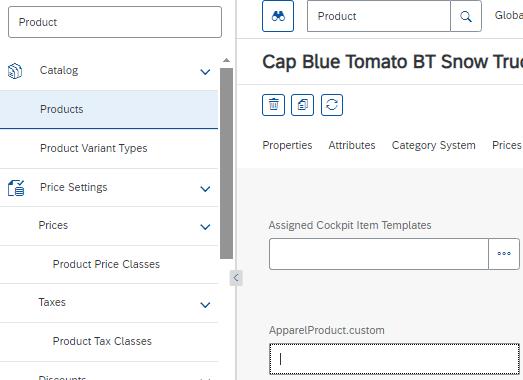
Do the build using “ant all” or “ant clean all”, start the hybris server and perform a HAC update, it will create a new attribute in the Product item type as shown below:
Step 3:
Add a new attribute in DTO of Product i.e. ProductData, corresponding to this new attribute in Model class in <custom-extension>facades-beans.xml as below:
<bean class="de.hybris.platform.commercefacades.product.data.ProductData">
    <property name="custom" type="String"/>
</bean>
Step 4:
Do the build using “ant all” or “ant clean all”, it will create a BallClubData POJO having those attibutes as member variables, getters and setters methods for the same generated.
Step 5
Write a populator which implements the Populator interface and only populate this field as below:
package org.training.facades.populators;

import de.hybris.platform.commercefacades.product.data.ProductData;
import de.hybris.platform.converters.Populator;
import de.hybris.platform.core.model.product.ProductModel;
import de.hybris.platform.servicelayer.dto.converter.ConversionException;

public class JSSProductPopulator implements Populator<ProductModel, ProductData> {
    @Override
    public void populate(ProductModel source, ProductData productData) throws ConversionException {
        productData.setCustom(source.getCustom());
    }
}
Step 6:
Create a bean for the newly created populator in step 5 in <custom-extension>facades-spring.xml.
1.  <bean parent="modifyPopulatorList">
    <property name="list" ref="productConverter" />
    <property name="add" ref="jssProductPopulator" />
</bean>2.  <alias name="defaultProductConverter" alias="productConverter"/>
<bean id="defaultProductConverter" parent="abstractPopulatingConverter">
    <property name="targetClass" value="de.hybris.platform.commercefacades.product.data.ProductData"/>
    <property name="populators">
       <list>
          <ref bean="productPopulator"/>
          <ref bean="jssProductPopulator"/>
       </list>
    </property>
</bean>3.  <alias name="defaulJsstProductConverter" alias="productConverter"/>
<bean id="defaulJsstProductConverter" parent="productConverter">
    <property name="targetClass" value="de.hybris.platform.commercefacades.product.data.ProductData"/>
    <property name="populators">
       <list>
          <ref bean="jssProductPopulator"/>
       </list>
    </property>
</bean>
Now whenever the product converter is called to populate ProductData from ProductModel our new populator will also be called and a new attribute will be populated and sent in response to the request.
Step 7:
Test the results
First, let’s update our new attribute with some value for a Product as shown below:
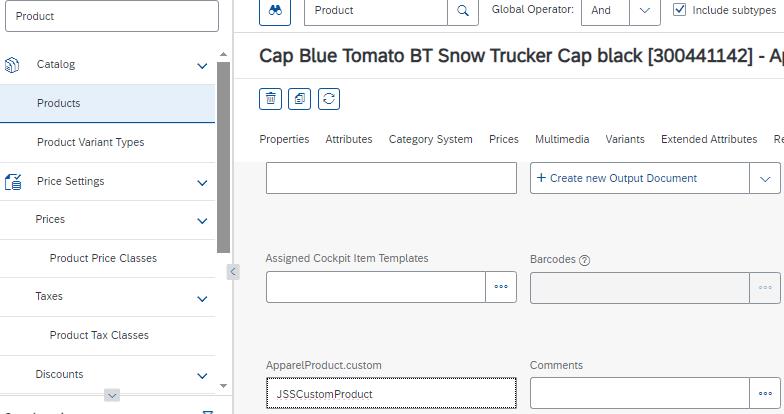
Now using Swagger we will get these product details:
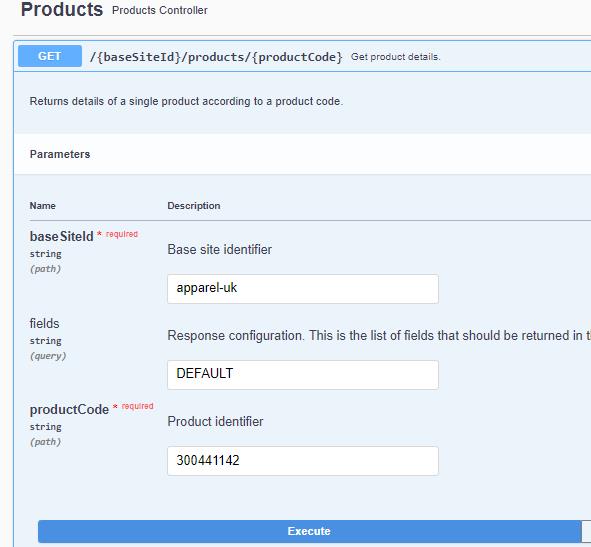
The sample output of the above request is shown below which has our new attribute: